Manage users
A user's Portal account determines what Prophix One applications the user can access, as well as any other applications the Portal admins choose to add.
Admins are responsible for adding and managing Portal user accounts.
Open User Management
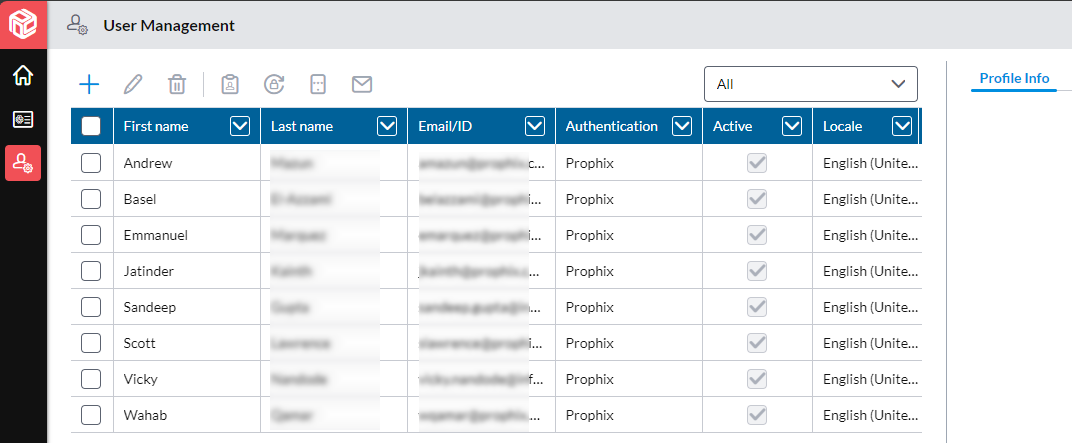
You can see a complete list of your Portal users in User Management.
-
In the left-hand panel, click User Administration > User Management:
Add users
You can add users one at a time, or import many at one time.
Add a single user
-
In User Management, click .
The Add User dialog appears.
-
Complete the following:
- First name and Last name can be up to 75 characters each.
- Email/ID must be unique and in valid email format: example@domain.com. Enter the user's email address in the Email field, exactly as it appears in your SSO provider.
- Portal role: Accept the default, User; if adding a Portal admin, select Administrator.
-
Active: Turned on by default so that the user can sign in immediately after setting a password.
Note: The system locks out a user after too many failed sign-in attempts and turns off Active. To re-enable the user's account, turn on Active.
-
Authentication: Select the service the user is required to use to sign in to Portal (as specified in SSO and Authentication.
Note: Users who are assigned Prophix Authentication, on initial sign-in will be prompted to set up MFA and will then be required to supply a one-time password on subsequent sign-ins.
Note: All admins, on initial sign-in will be prompted to set up MFA so that they can use Prophix Authentication in addition to their assigned SSO method.
-
External provider key: You can type the provider key, or leave the box blank, in which case the user's Email/ID are automatically added.
(This option only appears if the user's assigned Portal Authentication definition uses OIDC.)
Note: If the user's Email/ID is changed later, you must update External provider key manually.
-
Locale: Optionally, set the language as well as number and date formats for the user.
-
Click Save.
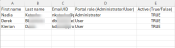
Import users
In addition to adding users singly, you can import them in a batch using a CSV file.
Note: The import procedure optionally lets you assign one application and any number of its instances to all the users in the batch.
Tip: If you want to assign more applications and instances, use the Assign applications procedure.
Also note that the import process ignores any record where the user already exists in Portal.
-
In User Management, click Import Users.
The Import Users dialog appears.
- If this is the first time you are importing users, to get a CSV file with the required format, click Download User Template.
-
Open the CSV file and add the user information.
Tip: For editing the CSV file, Prophix recommends using Microsoft Excel.
- For each user you want to import, complete the following columns (all are required):
- First Name: Up to 75 characters.
- Last Name: Up to 75 characters.
- Email: Must be unique and in valid email format: example@domain.com. Ensure that email addresses in the file match the casing used by your SSO provider.
- Portal Role: Type either Administrator or User.
- Active: Type either True or False.
-
Save the CSV file.
Note: File size must not exceed 100 KB.
- For each user you want to import, complete the following columns (all are required):
- Return to the Import Users dialog.
- (Optional) Select the Application.
- (Optional) From Instances, select all the application instances that apply to the user(s) you want to import.
- To browse to the downloaded CSV file, click .
- Select the file and click Open.
-
Click Import Users.
The import process runs; when it is complete, the Results dialog appears, showing the following:
- Number of uploaded users: Total of records successfully added or altered.
- Number of ignored users: Total of records that were not changed (because they already existed).
- Number of rejected users: Total of new records that were not imported because they failed one or more validations (for example, Portal Role contained an invalid value). For more information see the Reason for rejection section.
- Click Close.
Copy users between accounts
You can copy user configurations from one account to another to reduce errors and save time during testing or environment refreshes. This is useful for organizations that manage multiple accounts such as production, training, testing, etc. Instead of manually recreating users, you can export user configurations from one account to another.
Note: Portal Administrator access in both the source and target accounts is required.
This admin uses the Users grid to export users from a source account and import them into a target account using the Import Users template. Existing users in the target account keep their profile details. Any new users in the file are created automatically in the target account.
Note: This feature is designed for one-time or occasional use; automated synchronization is not included in this release.
Export users from the source account
-
In the User Management page, click the Application/Instance drop-down:

-
Select a source application instance to filter users.
For example, to export users from your Test environment, select Test.
Users with access to the selected instance appear. See Filter users for more information.
-
Select the rows for the users you want to export.
-
Click the Export Selected Users icon in the ribbon. The export file is generated and matches the Import Users template:
Note: The Active column exports as TRUE or FALSE.

Import users into target account
-
In the User Management page, select a target account in the Application/Instance drop-down
-
Click Import Users. The Import Users dialog appears.
-
If applicable, select an Application and one or more associated Instances.
If you do not select any Instances, any new users in the imported file are created in the target account without application instance assignment.
Tip: Portal Administrators can assign multiple Instances of the same Application at the same time. For example, to assign two FP&A Plus Instances to imported users, first select FP&A Plus as the Application, and then, select the two Instances.
-
Select the exported file and click Open to upload it.
-
Click Import Users.
The import process runs; when it is complete, the Results dialog appears and shows:
- Number of uploaded users: Total of records successfully added or altered.
- Number of ignored users: Total of records that were not changed (because they already existed).
- Number of rejected users: Total of new records that were not imported because they failed one or more validations
- Click Close.
Troubleshooting
Import fails with “invalid format”
-
Ensure that the file headers match the Import Users template.
-
Confirm the Active column uses TRUE or FALSE only.
Users did not appear
-
Verify the users were selected during export.
-
Confirm the users are included in the exported file.
Assignments did not update
-
Ensure user identifiers (such as email address) match between accounts.
Export button is disabled
-
Select at least one user in the Users grid.
A newly added user cannot sign in via SSO
-
Confirm the email address entered in Prophix One matches exactly what your SSO provider has on record — including domain casing.
An imported user receives an authentication error on first sign-in
-
Check the import file to ensure the user's email address was not inadvertently altered (e.g., auto-corrected to all lowercase) before upload. Re-import the user with the correct casing if needed.
Users added before release 2026.4.0 still cannot sign in via SSO
-
Users provisioned prior to this release may need to be re-added or have their SSO identifier updated by your Prophix administrator. Contact Prophix Support if you need assistance with bulk remediation.
Filter and edit users
You can change the details of a single account, or select multiple accounts that have similar details and change all of them at the same time.
Note: If a Portal admin's authentication method is changed, a prompt may appear requiring the admin's MFA to be set up again.
Filter users
By default, User Management lists all the user accounts. You can filter the list based on applications and instances.
-
In the User Management page, click the Application/Instance drop-down:
- Do one of the following:
- To see the users with access to any instances of an application, select the application.
- To see the users with access to a specific instance of an application, select the instance.
- To see all users, select All.
Edit a single user account profile
-
In User Management, select the row of the user account you want to edit.
-
Click .
The Edit User(s) dialog appears with all details available for editing.
-
Make your changes.
-
Click Save.
Edit multiple user account profiles
-
In User Management, select the rows of the user accounts you want to edit.
-
Click .
The Edit User(s) dialog appears with the users unique information unavailable for editing.
-
Make your changes as necessary to Portal role, Active, Authentication, and/or Locale.
-
Click Save.
Delete users
You can delete one or more user accounts at the same time. Deletion removes all data across the Prophix One platform pertaining to the user. However, data in non-Prophix One applications is unaffected.
-
In User Management, select the row(s) of the user account(s) you want to delete.
-
Click .
-
Confirm your decision.
-
Click Save.
Tip: Deleting the user designated as the primary contact is not allowed. If you want to delete that user, you must first go to Account Information and assign a different user as Primary contact.
Get users count/limit
Your Prophix account allows for a set number of "active" users. For more information, see the FAQ below.
To see your Active user limit and the current number of active users, look at the bottom of the User Management page:

Tip: You can also see the active users count and limit on the account information page.
Manage app assignments
Assign/unassign applications
Before users can access a Prophix One application, you must assign the application. (You manage the list of applications here.)
You can only assign/unassign one application at a time.
- In User Management, select one or more user rows.
-
Click .
The Application Administration dialog opens.
- In the Assign/Unassign tab, select Assign or Unassign.
- Select the Application.
- From Instances, select the application instance(s) that apply to the user(s).
- Click Apply.
Note: Assigning an application as described above only grants the user(s) the most basic privileges and settings therein. It is the responsibility of the admin to further define roles and authorizations within the specific instance(s) for the selected user(s).
Application assignment notes
Some points and special cases around application assignment:
-
If you assign an application instance to an existing user of the instance, there is no effect on the user's privileges and roles.
-
If you delete all the administrators within an instance of Prophix Financial Consolidation, the next user that you assign to the instance is automatically granted administrative privileges within the instance.
Disable assignments
You can disable access to an application instance for selected users and re-enable access later. This ability is handier than either removing the assignment or deleting the user. Typically you would use this option because the application instance is undergoing maintenance and you want to temporarily restrict access.
-
In User Management, select one or more user rows.
-
Click .
The Application Administration dialog opens.
- Select the Enable/Disable tab.
- Select Disable.
- From Application select the app you the user(s) suspended from.
- From Instances select the instance.
-
Click Apply.
Note: In the case that a user has access to multiple instances of the same application, and you want one or more instances disabled, you must disable each instance separately.
Now in User Management, in the right panel if you select the Assigned Apps tab, you see that for the selected user(s) this Application/Instance combination appears disabled. In the Prophix One Home page of those users, the Application/Instance Launch button is disabled.
Re-enable assignments
To re-enable assignments, use the above procedure but in the Enable/Disable tab, select Assign/Enable App and select from the Application and Instances as before.
Remove assignments
You remove application assignments one user at a time.
Caution: Removing an assignment deletes the user's account from the application instance.
-
In User Management, select the row of the user account.
-
Click .
The Edit User(s) dialog appears.
- Select the Assigned Apps tab.
- For each assignment you want to revoke, under Remove, click .
- Click Save.
- Confirm your decision.
Define roles
You define roles within application instances one user account at a time.
Note: To access the selected authorization page, you require the appropriate admin privileges for the application and instance.
- In User Management, select the row of the user account you want to define roles for.
- Select the Assigned Apps tab.
-
For the Application/Instance combination that you want to define the user's authorization to, click .
The user authorization page for the selected combination opens in the current browser tab.
Tip: To open the user authorization page in a new browser tab, press CTRL and click .
- Define the role(s) as per the application.
Unlock an account
Portal locks out a user account after too many failed sign-in attempts.
-
In User Management, select the row(s) of the user account(s) you want to unlock.
-
Click .
The Edit User(s) dialog appears.
-
Turn on Active.
-
Click Save.
Manage passwords
Reset passwords
You can reset user account passwords for the Prophix One Platform, both for a single user or multiple users.
Note: You can only reset the password for users assigned Prophix Authentication or who are Portal Administrators.
- In User Management, select the row(s) of the user account(s).
-
Click .
The selected users receive an email titled Update Your Account.
- The user opens the email and clicks Link to account update.
- In the dialog that opens, the user clicks Click here to proceed.
- The Update password dialog opens and the user provides a new password.
- When the change is accepted, the user clicks Back to Prophix.
Send an invitation email
Use the following procedure to invite new users of the Prophix One Platform to create their password.
The procedure differs depending on whether the users have Prophix Authentication or custom SSO.
Prophix Authentication users
- In User Management, select the row(s) of the user account(s).
-
Click .
The selected users receive the following emails:
-
Welcome to Prophix: contains instructions, a Prophix Account ID, and a link to the Prophix sign-in page.
-
Update Your Account: contains instructions for updating the user's password.
-
- The user opens the email and clicks Link to account update.
- In the dialog that opens, the user clicks Click here to proceed.
- The Update password dialog opens and the user provides a new password.
- When the change is accepted, the user clicks Back to Prophix.
Custom SSO users
- In User Management, select the row(s) of the user account(s).
-
Click .
The selected users receive the following emails:
-
Welcome to Prophix: contains instructions, a Prophix Account ID, and a link to the Prophix sign-in page.
-
Update Your Account: contains instructions for updating the user's password.
-
- The user signs in using your organization's custom SSO method, as described here.
Set up One Time Password
If an MFA user's phone is lost, the user typically cannot use MFA to sign in. In this situation you can create a One Time Password (OTP) for the user. You can then prompt the user to set up MFA again at the next sign in.
Prerequisite: in Security Settings, the MFA option must be turned on.
- In User Management, select the row(s) of the user account(s).
-
Click .
The Set up One Time Password (OTP) dialog appears.
Note: If you select one or more users who are not verified, the system will not execute the OTP setup procedure. Instead, an Attention message appears indicating that one or more selected users are not yet verified and provides instructions on the next steps to take.
- Click OK.
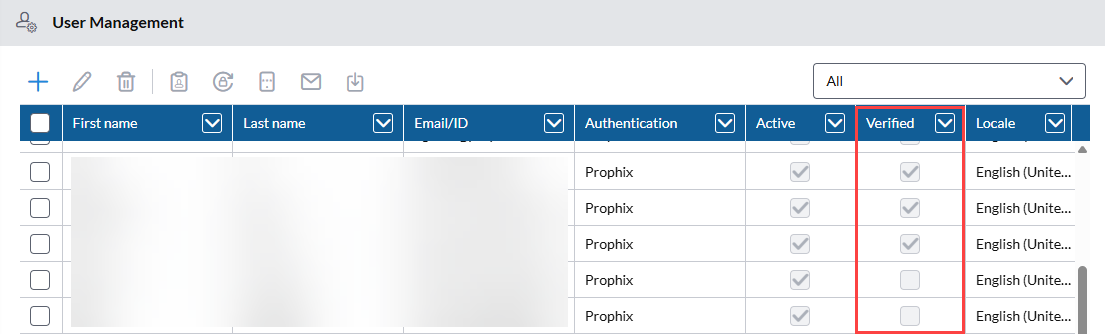
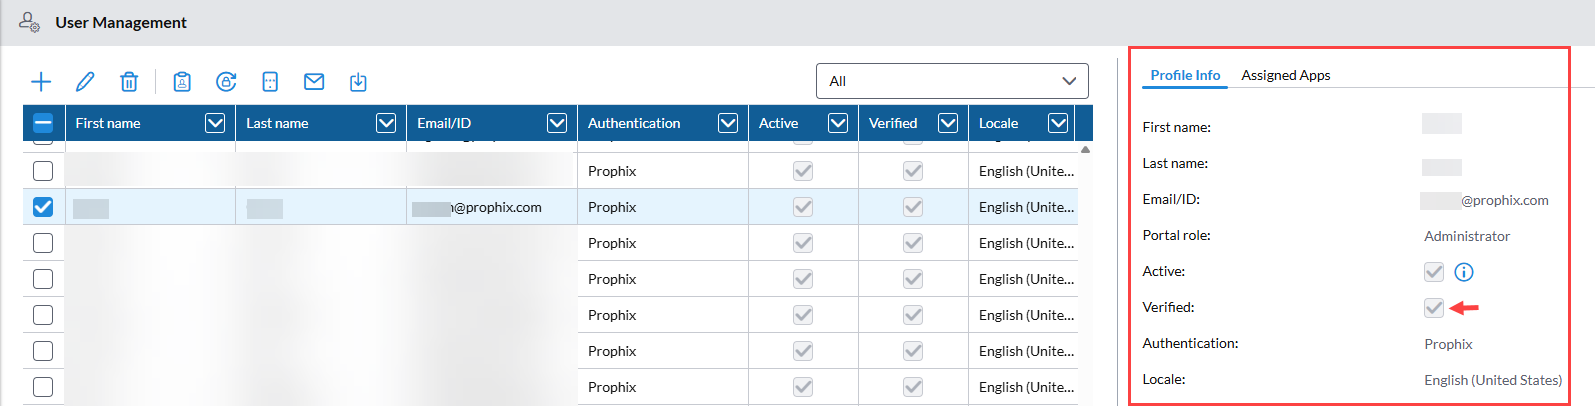
View user verification status
You can view a user’s verification status in several locations within User Management. The Verified status indicates whether the user has completed the initial account setup, including setting a password and logging in for the first time. Reviewing this information helps you follow the correct onboarding steps.
To view user verification status in the User Management grid:
-
In User Management, review the Verified column.
-
A ✓ indicates that the user is verified.
-
A blank field indicates that the user is not verified.

-
To view verification status in the user’s Profile Info:
-
In User Management, select the user’s row to open the profile view.
-
In Profile Info, check the Verified field.
To view verification status in the Edit User(s) dialog:
-
In User Management, select the user’s row.
-
Click .
-
In the Edit User(s) dialog, check the Verified field.
Audit users
Admins can generate reports that audit various events in Portal.
Each report is a CSV file that you can open in a text editor or Microsoft Excel, and is limited to the first 10,000 records.
Create an audit log report
-
In User Management, click Generate Report.
The Generate Report dialog appears.
-
From Choose report, select one of the following:
-
Assign and Unassign
Shows when user application assignments occurred.
-
Delete User Events
Shows when user account deletions occurred and who made the deletion.
-
User Report
Shows the current user list and includes when each user was created, the last time their account was modified, and the user's assigned applications.
-
Login Events
Shows various log-in-related events, including sign-ins (both successful and failed), forced sign-outs, password updates, log-outs, and IP addresses.
-
-
Under Time Range, specify the Start date and End date.
Note: Time Range is limited to the last 180 days and does not apply to the User Report.
-
Click Download.
The report is downloaded as a CSV file.
Audit log events
The audit log records events grouped into the following areas:
- User Management:
- User created; user Email/ID changed, deleted, or Active option changed
- User's authentication name was changed
- User's Portal Role was changed
- User was requested to set up a one-time password on next login
- SSO and Authentication:
- User's SSO definition created, changed, or deleted
- Security Settings:
- User's security settings changed
- Account Information:
- Account's primary contact was changed
- Prophix One Intelligence legal addendum signed
- Prophix One Intelligence activated/deactivated
FAQ
What is the Active user limit?
An "active" user in Portal is one whose user profile has the Active option turned on.
The Active user limit is a value in your organization's Portal account that sets a maximum for the number of active users. (To change this limit, contact your Prophix account representative.)
If your active user count reaches the Active user limit, Portal will not allow the addition of further active users.
What are my options if I reach the Active user limit?
You can reach the Active user limit either by adding a user manually or by using the Import Users function.
When Portal detects that you are trying to go beyond the limit, your action is rejected and a warning message appears.
Before you add an active user manually, you can do the following:
- Turn off the Active status of an existing user.
- Contact your Prophix account representative to have the Active user limit increased.
Before you add active users through a batch import, you can do one or all of the following:
- Turn off the Active status of an equivalent number of existing users.
- Reduce the number of Active users in the import file.
- Contact your Prophix account representative to have the Active user limit increased.
Can I use an older “Generate User Report” file?
No. You must use the export generated from the Users grid.
Can I automate user synchronization?
No. Automation is not supported in this release.
How do I check for a user’s verification status?
User Management, select the user and look in the Verified column. A ✓ indicates that the user is verified.